As your 4x4 ages, the parts become harder and harder to find. Sometimes upgrading to a newer version of the part makes more sense. This was the case for our Land Cruiser's hydraulic clutch system. Over the last few years, the clutch pressure was slowly being lost, and it had gotten to the point where we had to double-pump in order to shift without grinding gears.

A close inspection of the hydraulic system showed that the clutch master cylinder had a small leakmaking the pedal response very poor.
We initially looked for a re-build kit but quickly found that they don't make them for 1970s and older vintage Toyota Land Cruiser 4x4s. Our next best option was to replace the master cylinder. We did some searching and found out that JT Outfitters, a reputable Land Cruiser parts retailer in North Carolina, has a complete conversion kit that updates both the master and slave cylinder to the newer design found on 1975 and newer Toyota Land Cruiser FJ40s.

The JT Outfitters Clutch Master & Slave Conversion Kit consisting of a genuine late-model Aisin Master Cylinder, Aisin Slave Cylinder and a 35-inch steel braided Teflon line with a banjo-style fitting. This kit fits early to 8/1974 FJ40s and FJ45s (Part# CHC40 3SPD).
When ordering, JT Outfitters has two length of lines, one for those running the factory inline-six Toyota 4.2l motor, and a longer one for the popular small-block V8 conversions.
Since our inline-six has some high miles on it, we opted to get the longer line just in case we ever decide to go V8. It was only an additional $20 for the extra length.
Nathan at JT Outfitters helped us out with all our questions about the clutch master and slave conversion kit. The staff at JT Outfitters is very knowledgeable about Toyota Land Cruiser and Toyota 4x4s in general.
THE INSTALLATION
Our first impression of the JT Outfitters Clutch Master & Slave Conversion Kit was good. We liked the fact that they use high-quality genuine Aisin components. We really liked their high-pressure steel braided line. It really makes the whole thing come together nicely. The steel-braided line not only looks good, its designed to give a much better response from your hydraulic clutch system than the factory rubber hose made in the 60s.
The way the steel-braided line works is simple. It keeps the hose diameter the same size at low and high temperature is much better than a rubber hose with no steel woven into it. It's not just for looksbut rather a functional element that is frequently used in racing applications for hoses under a lot of stress, like brake, fuel and hydraulic lines.
The installation went rather quick. The kit was designed to be a direct bolt-on, so no modifications are required.
You're going to need some basic metric tools and supplies to get the job done:
12mm socket and wrench
12mm & 16mm Flat Nut wrench
Flat screwdriver
Needle nose pliers
DOT3 brake fluid
Brake bleeder
Empty bottle
WD40
Loctite
Shop rag
Flashlight
Gloves
Safety glasses

We started by removing the old hose at the slave cylinder end (bottom). From there we captured the old hydraulic fluid in an empty bottle. It helps if you can pump the clutch pedal until no more fluid comes out. It will speed up the old fluid recovery process. Keep this bottle around for bleeding the system later.
Since we were already working on the slave cylinder end, next to the clutch--we decided to tackle this end first. There were only two bolts to remove for the slave cylinder.
We compared the old slave cylinder with the newer slave. Although they looked similar, we found that the size of the thread was different. The new Aisin slave would only work with the steel-braided line in our JT Outfitters kit.
 We checked and cleaned the area, put some Loctite on the bolts and bolted on the new slave cylinder. There is some adjustment needed on the shaft that engages the clutch fork. You can gauge with your old one, and fine-tune once your system is fully assembled and bled. All you have to do is loosen the counter-nut to turn the shaft. This lengthens or shortens it.
Next is removing the old hose. There is a bracket in the upper section of the firewall that ties in a section of steel tube from the master cylinder to the lower half rubber hose that goes to the slave cylinder. These fittings are old and set, so working in some WD40 will make the job easier. Also, having special flat nut wrenches will ensure that you don't strip the fittings. We picked up a set of metric Craftsman Professional Flare Nut wrenches for under $34.
Once you have the old clutch system line out of the way, youre ready to remove the clutch master cylinder.
The master cylinder is held in place by three 12mm bolts. Adding some WD40 to these old bolts on the firewall will make the job easier. While the WD40 seeps in, you can work on removing the clutch pedal on the inside of your Land Cruiser.
You will need the needle-nose pliers, flat screwdriver and flashlight. The pedal connecting rod is stuffed under the dash, on the inner part of the firewall. You will need to remove a cotter-pin connecting the clutch pedal and rod coming from the clutch master cylinder. You will also need to remove a spring attached to the clutch pedal. Once these items are removed, proceed to removing the clutch master cylinder.

To put in the new Aisin clutch master cylinder, simply put in place and tighten the three 12mm bolts (add some Loctite if desired). Re-attach the pedal to the rod with cotter-pin and stud, and then the spring. Check that everything is on correctly before moving on. If possible, replace the cotter-pin with new one (not included in kit).

Installing the steel-braided line can be tricky. We found that the best plan of attack is to start by attaching the slave cylinder end (closest to the clutch, under the body). This end has a thread end, so it requires the ability to twist the entire line before being able to tighten with wrench. Again, we recommend using the special flat nut wrench to prevent stripping.

The top side of the steel-braided line is much easier to install since it is a banjo end. Just place the copper washers on either end of the banjo and slip the hydraulic bolt through. The bolt is specially designed with a hollow core and holes on the surface that align with the banjo. This design allows for some play, and ensures fluid can access the line in a 360-degree surface area.
One caution we would like to add, when tightening the banjo bolt to your clutch master cylinder, don't over torque. It will sheer. We found this out the hard way. The inside is hollow, so its not as strong as a regular bolt.
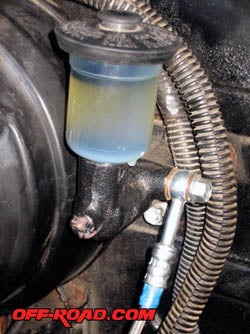
Once the JT Outfitters steel-braided line is in place, you will need to add hydraulic fluid. The Aisin clutch master calls for DOT3 fluid.
Add fluid to the clutch master cylinder reservoir and get ready to bleed your system. Make sure the cap is on the reservoir before moving on.
You will find a bleeding valve on the clutch slave cylinder (bottom end). To allow air out of the system, or bleed, you will need to loosen this bolt, which will then allow both air and fluid to escape the system. You can either use a bleeding tool or do it the old waywith a small rubber hose and empty bottle. You will need someone else to pump the clutch while you bleed.

Once you have bled the system, you can make adjustments on the master cylinder rod for your pedal, and at the slave cylinder for the clutch fork. To adjust, you will need to loosen a counter nut. The rod can be extended or shortened by turning the end. When you have the desired length, tighten the counter nut.
 You're done!
FINAL THOUGHTS
We are so happy with our JT Outfitters Clutch Master & Slave Conversion kit. It changed the way our Land Cruiser drives for the better. No more double pumping to switch gears or dancing on the clutch to keep it out of gear at a stop. The leak is gone, and the delivery of fluid feels crisp. The clutch engages and disengages on our foot command.
Having the newer component is also much nicer. We can actually find re-build kits for these when the time comes. Another nice addition is the steel-braided line. We really like the way it looks in the engine bay. It also has done really well under our hot engine bay, sitting next to the exhaust header.
This was truly an easy upgrade and certainly money well spent.
SOURCES
JT Outfitters
http://www.jtoutfitters.com/
|
Off-Road.com Newsletter Join our Weekly Newsletter to get the latest off-road news, reviews, events, and alerts! |
Follow @Off-Road
 Your Privacy Choices