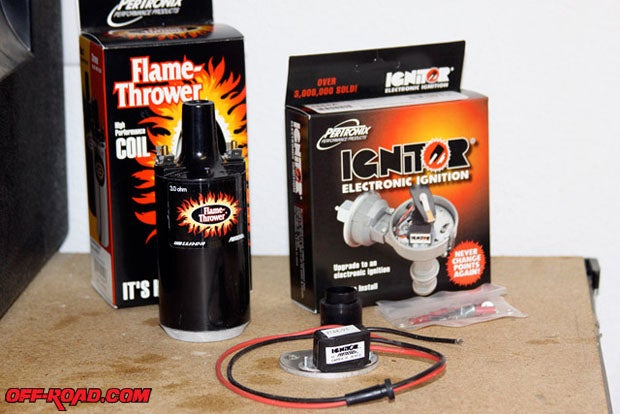
There comes a time when dealing with point-type ignition is no longer an option especially when your vehicle constantly faces dirt, water and harsh terrain. Our early Toyota Land Cruiser was still ticking after 40 years, but it did lack power during acceleration and low RPM. Gear head friends told us to ditch the points and upgrade to an electronic ignition system. We looked around and found an electronic ignition kit that would retrofit our factory distributor to be a high-performance flame thrower - the PerTronix Ignitor kit.
Made in the USA and over 3 million sold, there must be something good about it. Talking to our gear head friends, we found that electronic ignition retrofit kits from PerTronix had successfully been used on vehicles such as hot rods, Jeeps and off-road trucks and tractors.
Although there is nostalgia in old mechanical parts and vehicles, we were happy to get rid of the point-type ignition system.
THE INSTALL
We took possession of a PerTronix Ignitor kit, part # 1665A made for Toyota six-cylinder 3.8l F motor. We began by checking contents of the kit and reading through the detailed instructions. The kit is simplea base plate, electronic ignition module with two wires, two nuts and three screws. That's it!
We began by disconnecting the battery and then proceeded by removing the distributor cap to gain access to the internals of the distributor.

It is recommended at this point to examine cap, rotor and spark plug wires. Replace any components showing excessive wear. In our case, we had recently done a full tune-up on the engine; new ignition wires, rotor and cap had all been replaced.


Insert both wires through the wire exit hole, and pull the grommet into place. Check to insure that the wire does not contact any moving parts. Attach the provided wire terminal to the wire ends.

 side of the ignition coil.")

For installations that don't use a primary ballast resistor, connect the red Ignitor wire to the positive (+) side of the ignition coil (See Figure 2).
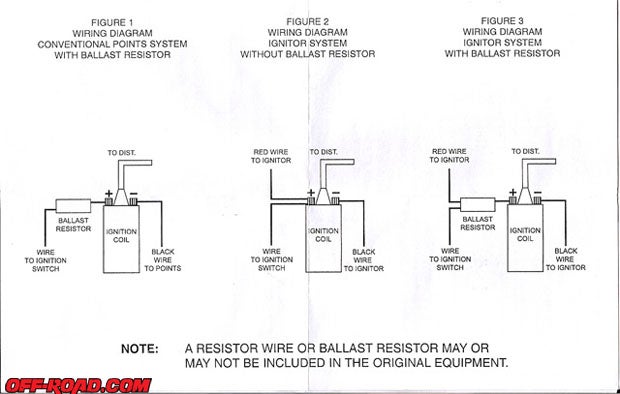
For installations that use a primary ballast resistor, connect the red Ignitor wire to the ignition switch side of the resistor (See Figure 3).
The engine can now be started. Let the engine run for a few minutes and then set the timing.
The installation went fairly smooth. We found that the use of a magnetic screwdriver will make this job easier, especially when dealing with little screws and nuts during the installation.
Cleaning and adding some dielectric grease to each end of your sparkplug wires is also recommended to ensure youre getting the best contact possible.
 Prior to this installation we had added a new set of spark plug wires, so we were set. If we still had the old ones, then we would have opted to use the Flame Thrower spark plug wires to complete our PerTronix install.
MORE VOLTS?
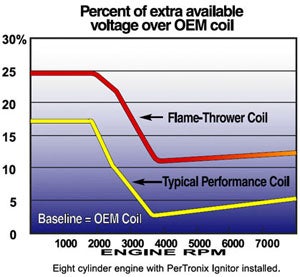
Although our ignition coil was still good, we chose to drop in a high performance Flame-Thrower ignition coil from PerTronix. The coil is designed to work in tandem with the Ignitor kitand will add some extra juice to this old cruiser. The Flame-Thrower ignition coil delivers 15% more spark energy and voltage than the stocker. The 3.0 ohm coil is designed to run on 6 and 4 cylinder engines. It gives a true spark over the full RPM range. The 40,000 volts enable larger plug gaps for greater fuel efficiency and power. It's also legal in all 50 states.
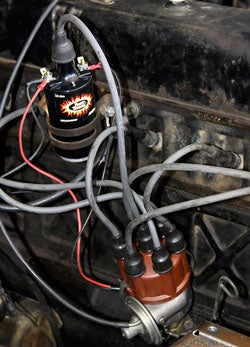
This was a straight drop in upgradewe just needed to adjust the coil bracket bolt, two small nuts on the positive (+) and negative (-) terminals, and the wire going from the coil to distributor cap.
Making sure all our wires were snug and in place, we hooked up the battery and hit the ignition switch. The cruiser started right up. We did need to make a small timing adjustment, but were soon off to test on the trails.
FINAL THOUGHTS
Our Toyota FJ40 Land Cruiser has definitely had its challenges with point ignition system. It had become a real pain chasing ignition and bad point problems all the time. Since we added the PerTronix Ignitor, there are no more points and no more headaches.
The FJ40 crawls without stalling at low RPM, and it also has a much quicker throttle response. It feels like it has more power. I'm not sure about the MPG savings, but if everything else keeps lining up in favor of the electronic ignition, I would venture to say that we will in fact see an improvement in mileage.
This upgrade runs than $120 bucks and will save you from wasting your time chasing ignition problems, changing burnt or pitted points, and experiencing mediocre performance. Not to mention that you no longer have to worry about dusty condition, humidity or bumpy roads. The electronic ignition system from PerTronix will keep the spark true.

If you have an early 4x4 that is still running points, do your self and your rig a favortake a look a PerTronix for an electric ignition solution to your point blues. You rig will thank you with horsepower and torque.
Resources:
PerTronix Performance Products
http://www.pertronix.com/
|
Off-Road.com Newsletter Join our Weekly Newsletter to get the latest off-road news, reviews, events, and alerts! |
Follow @Off-Road
 Your Privacy Choices