Your candlepower shortage will happen: old bulbs, bad lenses, crap weather, big distances, your old-school fixation, variable off-road terrain, whatever. Sometimes, its your fault, like lousy maintenance or undone updates, but other times, you just need more. While on-road solutions are constrained by good road manners and equipment violations, for off-roaders, on-trail lighting options arent hobbled by rules. When youre in the lumpy stuff, your candlepower capabilities are only limited to your creativity, your wallet, and whether youre smart enough to avoid blinding that seven-foot dude from the Big Belly Crew.

Speaking of shortages, we encountered one last winter deep in the sands of the SoCal desert. Our bumper-mounted angel-eye lamps had served us well, augmenting the OE 4Runner lighting in the tighter confines of rock and trail, but during a night run in the big sand of the Superstition Mountains, we literally ran out of light. The long run-ups and line-anticipation necessary to get a low-po high-mile 4Runner up and over the mountainous dunes meant running starts starts that outran the lights. While slinging a truck into the dark on pure skillset is a hoot, its not a good way to guarantee having that truck get you home. More light was needed for big sand, because in Southern California, dunes matter.
.")

Froaders lighting needs are usually motivated by the same things:
1. Brightness: we wanted big candlepower to avoid redoing the Which dune is this? tomfoolery that haunted our last Superstition night run.
2. Wiring: because we were wiring to the roof of the truck, we wanted to avoid running too much draw through the A-pillar.
3. Cosmetic appropriateness: the period-correct look of the angel-eye PIAAs already on the 4Runners front end was, if not sacred, at least primary, and we hoped to avoid overpowering it with overdone LEDs on the windshield.
4. Appearance v2.0: while we were at it, the massive brightness couldnt look prissy, because our truck was meant to be low-key the investment had to be subtle.
5. Cost: off-road hardware can be specialized and pricey. If we were going to shell out for something good, it had to be great.
 of Fageol Superchargers likes to tinker. He tinkered up our light bar out of scrap tube and some old blower pulley brackets he had laying around.")
Selection: What Lights and Why
Brightness. Appearance. Wiring layout. Cost-to-value. In that spirit, we sought out the most fitting lighting for a Japan-built trail dog like our Project Foreigner. We began with the prescription: low-key, powerful roof-mounted lighting that fit the truck, that went in easily, was built to take a beating, and that had the candlepower to flash-fry a water buffalo. LEDs were a quick choice: low draw (despite our Optima Yellow, we didnt want to overload any wires), and vibration resistance. Despite an urge to use matching round lamps, the additional work necessary to fit them nixed that idea; plus, theyd have stuck up higher. LED light bars, it is.


PIAAs 18-inch narrow-beam lamps proved ideal. The 18-inch housings (RF18), when sistered up end-to-end (using PIAA-supplied hardware), created a 36-inch LED bar that was narrow enough to suit the 4Runners roof, and because they fit between the end caps, it allowed the PIAAs to be hung off the racks leading edge. That rack mounting permitted the removability necessary to keep the PIAAs from being heisted, and let us avoid the driving-around-every-day-with-tough-guy-lighting braggadocio that stepped on our desire for a minimized profile. Plus, theyre built well the PIAA price came with a reputation for quality and an honest warranty.

aWhile its hard to resist buying a 52-inch roof-consuming light bar from the nearest Chinese knockoff LED manufacturer, each one begs the question: is bigger better? Could that big honkin light bar be doing you wrong?
- How much wind noise is generated by a light bar that hangs over your windshield?
- What about wind resistance?
- Does a light bar that reflects off your hood help or hinder your night vision?
- Are your wiring options limited by plumbing in an already busy A-pillar?
- Is that look played out?
. We intend to trim down the mounting bolts when were sure they wont have another use.")

Placement of the light bar (or any roof-sittin thing) back from the windshield header in this case, rearward of the factory moon-roof puts what is otherwise a wind-obstructing object in a low-pressure zone caused by wind moving up the windshield and over the roof. We found that wind noise was almost imperceptible with the PIAAs mounted there, even at freeway speeds. It also alleviated the hood-flash that often occurs with light bars mounted on the leading edge of the roof; the hood was hidden in a short shadow. Furthermore, mounting the bar further back meant we could use OE roof rack holes to route power.

Installation Plan: Using What Youve Got
Because of the low-profile nature of LED lighting, its mounting strategy leaves copious options. Think of where youve seen it installed: in, above, behind and below bumpers; behind the grille; in corner vents and markers; teardrop-style at the side-view mirror or in the A-pillar; on flat Jeeper hoods; the ubiquitous across-the-windshield-header; built into auxiliary roof racks; or, as in our case, mounted to and hung off the leading edge of the factory rack.

Lighting location is almost always a case of overlapping considerations. How much room do you need for the lights? How will they mount? Will that location let them work their best? Do they need room to breathe? Where will the harness go? How about the controller? Can 12 volts get there? Will they be removable (and theft-protected)? Will they look tough-guy or low-key? In this case, the PIAA LEDs fit between the end caps of the roof rack so they could hang low; they were able to project forward without obstruction; the dual harnesses, while powered from the battery via the A-pillar, could be hidden in the roof-reinforcing header cavity, using local nooks for the switchgear and ported to the roof through OE rack openings.
. The power and ground wires can be seen in the drivers A-pillar.")
Of course, the math for this win-win took a little while to plan. If wiring looks too easy, youre probably missing something important.
Mounting Your LEDs: Meet Your Local Fab Guy
Its not a matter of if: when you begin creating innovative plans for lighting or anything else truckventurous, youll need to know a fabrication guy. Want a piece of metal to serve as a bracket? Hell have a piece of scrap aluminum thats perfect. Need to weld up a crack? He knows how. Want to build a rack that hangs your PIAA LEDs off the leading edge of your factory roof racks? Forget Home Depot draw up some simple plans and let Fab Guy do his thing. It might cost you a few bucks or a few brews, but the results are fitted, not haphazard, theyre much more likely to stick together, and Fab Guy might just enjoy using up his leftovers.

Our rack which Mark Fageol, supercharger manufacturer and fabrication whiz, built in two sessions was an exercise in straightforward engineering. One square steel tube was fitted to the arc of the Toyota roof rack (fixed in place with a few bolts and washers), and was made of scrap steel Mark had kicking around his shop. The bar suspended the PIAAs in front of the rack and about a centimeter from the 4Runners roofline. Perfect. Mark threaded the rack feet to take the bolts, and got creative with some rod stock to reinforce the light tabs (as the PIAAs robust construction meant they were a little heavier than the average bear).
, use factory ports and holes and openings. Because we needed to shorten the PIAA power leads to the LED bars anyway, clipping them to run the wire through this opening in the roof was a no-brainer.")

While a rattle-can paintjob was an option, it wasnt a good one. Just like a good fabricator, its important to know your local powdercoater. Powder1 something of a San Diego fixture had a rack of matte-black customer pieces about to run, and we had them throw this light bar in the batch. Powdercoated parts are so much nicer to work with, they look good, and the coating lasts.

Wiring is the Fun Part when you Plan
Simply put, lighting on the roof is easier with the wiring harness in the roof (at least when working on OE-based vehicles). Weve home-brewed harnesses before using as-available hardware, but in the name of warranty preservation, we used the PIAA parts as much as possible. Other than shortening a few wires, the PIAA kit worked well micro relays and small switchgear made routing and locating parts easy. The leading edge of the third-gen 4Runners roof is reinforced with a marginally boxed header, and the cavity inside that header already houses some sunroof parts and sundry wiring. Room enough was left for two harnesses: because we were running two separate 18-inch PIAA LEDs, we elected to have them separately controllable, routing each ones power to a side of the roof.

Sticking to the details: 12-volt and ground were run in 12-gauge stranded, from the battery to the harnesses in the roofline (the power side fused). The harnesses shared these leads. Harnesses were tucked into the header, and LED power was run through rack-mount holes in the roof. We had to shorten the overlong PIAA harness in this spot already, so we snipped and reattached the plug so we could route the jacketed PIAA power lead through the unmodified hole (even shortened, three feet was left of the harness on the roof). The trick of working in the roof region was being willing to remove interior parts to get at it. The one-piece headliner had to be drooped down, with trim parts and the oh crap handles taken off past the B-pillars. Take your time lots of these soft interior parts are delicate and/or dried out.

Its not that this was an easy process making the right combination of candlepower work right takes work. Because of the need for brightness and durability, we reached for PIAAs, counting on a robust installation and smart fitment to make these the last forward-facing lights well need.
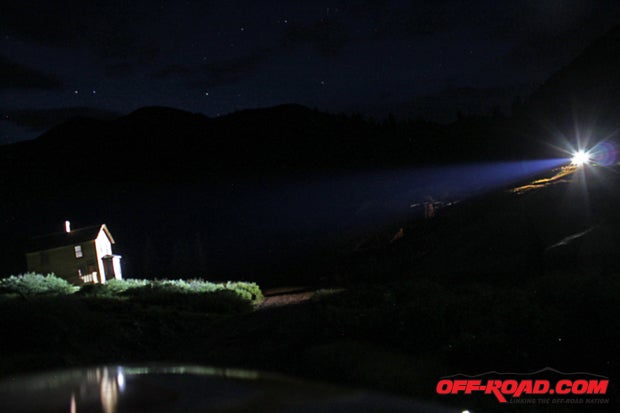
 at night. The PIAAs were able to illuminate the Walsh House from a quarter-mile across the valley (though you can see the tight pattern, which is why we splayed them out a little further).")
CONTACT
PIAA
www.PIAA.com
|
Off-Road.com Newsletter Join our Weekly Newsletter to get the latest off-road news, reviews, events, and alerts! |
Follow @Off-Road
 Your Privacy Choices