<-- Back to part 2 Understanding
the Fundamentals
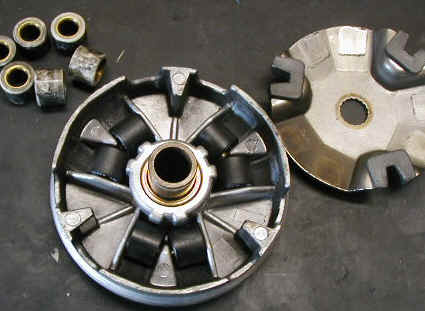
Removing the front variator is relatively simple
if you have an impact wrench. Just spin the nut off the crankshaft
and slide off the outer part of the clutch. Next, remove the belt.
Last, slip off the inner part of the variator. Make sure all the
surfaces are fairly clean and free from burrs or buildup. Click
here for an exploded view of the entire clutch
system.
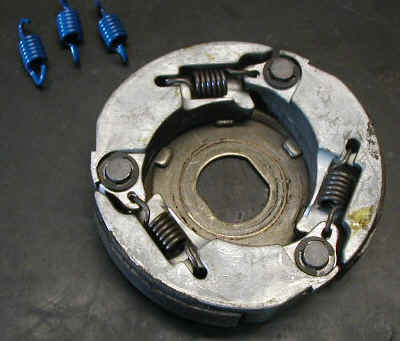
Removing this nut will liberate the large
torque-driver compression spring as well as expose the three small
shoe-springs. The shoe springs take some finesse to remove and
reinstall. Be extra careful to a) not poke a hole in your hand, and
b) shoot the spring across the shop. When installing new springs, a
heavier spring will delay the engagement rpm (higher stall) and a
lighter spring will do the opposite. Some riders prefer a hard
hitting clutch which results from a higher rpm stall, while others
appreciate the lower rpm/power engagement.
So, how does the average Joe do it? The reality of the matter is that most guys will replace this highly specialized process with good ol’ fashioned track testing. Although seat of the pants feel goes a long way, it can’t be relied on for the last 5-10% of refinement. Using a stop watch, a marked-off flat section of track, and a consistent rider you can also dial in your clutch with some trial and error. Make at least three pulls with your machine fully warmed up and use the average time. Pick a section of track that’s flat and has few ruts, bumps, etc. The length of track should be just enough to allow the machine to just come off the clutch, where you notice that rpms start to climb again ("rev-out" point). Don’t pull to the redline since the machine performance will fall off quickly there. The heavier the rider the better, since it makes the pull longer and minimizes the effects of errors due to timing.
 |
|
Using some graph paper you can plot the time for each roller combination to identify the best setup. |
Off the line the rpms should rise quickly and over-rev just slightly. This is due to the rear clutch shoes slipping and finally engaging fully. Any burble or hesitation here should be addressed through jetting, not clutching. Once the rpms settle into a steady whine, they should hold steady until the clutches run out of ratio adjustment, then start rising towards redline. Up to this point, any slipping would sound like the revs being unsteady or climbing. If so, change to a stiffer rear torque driver spring.
Using a systematic trial and error method, you can then dial in your roller weights. If you notice that the machine really starts to accelerate harder after the rev-out point, that's a perfect indication your clutch rpm setting is too low- go to a lighter roller weight. The reason for this is that the clutch is keeping the motor from reaching the peak power rpm, but after the clutches run out of ratio, the engine finally drives through that "sweet spot". As you keep moving down in roller weights you'll notice your times will improve but begin to flatten out, then start to take a increase again as you pass the power peak rpm. It may be helpful to plot your times against roller weight on some graph paper and draw a curve between your points.
Swapping out your clutch parts can be challenging. First, remove the LH clutch cover. Don’t forget to remove the screw in the center of the cover. Some light tapping from the other side of the motor with a hammer and screwdriver against the cover tangs can help to break the gasket seal. Finally, coaxing the cover off the two dowels make take some additional tapping, wiggling, and prying since the steel dowels have a tendency to rust slightly in the aluminum cover.
 |
|
Front variator disassembled showing new rollers inside. |
New rollers in a variety of sizes
are available from most of the mini-quad aftermarket suppliers such
as Hetrick
Racing and come in sizes ranging from 3.2 grams to 9.2 grams
per roller (stock is about 6.5) in ~0.5g increments. These sizes
will vary rpms from roughly 8500 rpm to 5000 rpm when using all six
rollers. You can, however, only use three rollers, or use three of
one size and three of another (alternating) to get just the right
rpm. To install, reverse the disassembly process and torque the
crank nut to 39Nm by inserting a flathead screwdriver between the
teeth of the starter gear and case webbing.
The rear clutch is a bit trickier. Remove the
small O-ring and nut holding the clutch onto the shaft. Once
removed, you’ll notice a huge nut on the rear shaft –
about 1-5/8” or so. There are two options. One is a socket
and impact wrench, but finding one is not common outside of a
Caterpillar or Mack service yard. Making a custom spanner wrench is another option.
 |
|
Rear clutch disassembled showing shoes and springs. |
And lastly, to ease the process of parts swapping, don't worry about installing all the cover screws- three or four will be more than enough for testing purposes. However, DO make sure to use the cover. For two reasons: one is obvious- safety, but the other is that the cover has an outboard bearing in the cover that provides critical support to the rear clutch shaft.
Take your time, think about what's going on, take careful notes, and you'll be way ahead of the other guy who didn't.
|
Off-Road.com Newsletter Join our Weekly Newsletter to get the latest off-road news, reviews, events, and alerts! |
Follow @Off-Road
 Your Privacy Choices